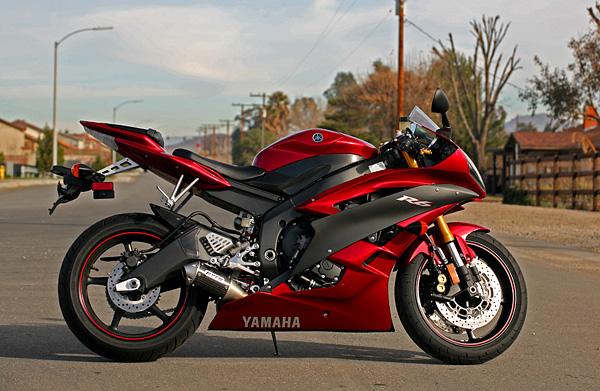
After Yamaha’s new-for-2006 YZF-R6 won our 2006 Supersport Shootout, we decided it would be a good idea to ask Yamaha for an R6 to use as a long-term test bike, with the idea of letting our readers know what the R6 was like to live with every day for a period of 6-8 months. Since picking up our 2007 model (unchanged except for color schemes) about two months ago, I’ve re-discovered why I loved this bike so much in the first place – direct steering, incredible front-end feedback that inspires the confidence to carry massive corner speeds, superb suspension and an all-around incredible chassis. Yeah, I packed quite a few superlatives into that sentence, but if you’ve ever taken a new R6 through a twisty canyon road or around a racetrack, you’d understand why. To read more about my impressions of the R6, take a look at the ‘First Place’ section of the previously mentioned Supersport shootout.
So where did we see room for improvement over the stock R6? The chassis is so good that I’m leery of making any changes at all in that area, but the ultra-revvy powerplant could use more grunt for around-town riding (we’ll target this area in future updates). Our main goal, however, was personalization – buying any Japanese middleweight inevitably means you’re not going to stand out in the crowd, as you’re likely to find your bike’s twin, triplet, and more at any bike night or canyon hangout you attend. Pride of ownership can be enhanced by a few well-placed additions to a stock motorcycle, as each modification takes the bike farther from stock and closer to the owner’s ‘vision’ for his machine. With that in mind, this initial long-term update is focused primarily on easy-to-install parts that enhance the visual impact of our R6 and its ability to stand out in a crowd.
GYT-R Carbon Accessories
The race-inspired look of carbon-fiber accessories has become incredibly popular over the last decade, as for any true racing enthusiast the look of the carbon weave immediately conjures images of MotoGP racers and Formula 1 cars and their ultra-trick carbon components. Although carbon fiber can be used for structural components (most MotoGP bikes don’t use a subframe at all, just a self-supporting carbon tail section), most of the carbon components you see on street bikes are more cosmetic than functional. In the past, carbon accessories were the province of after market manufacturers, but in recent years Yamaha has really stepped up the depth and quality of their GYT-R accessories line-up to include the most popular carbon pieces for the company’s sportier bikes.
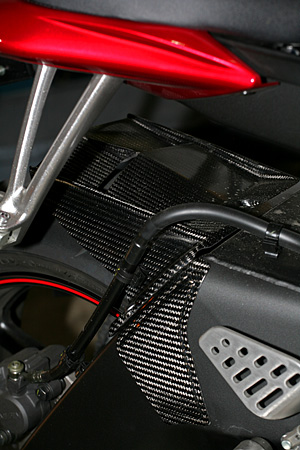
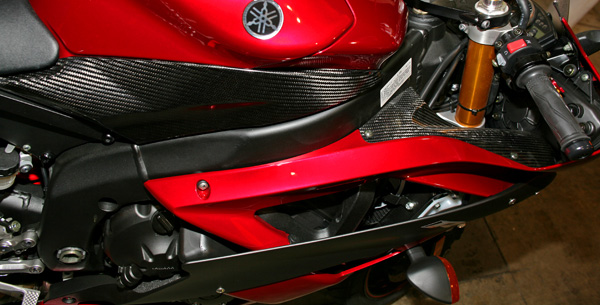
Our R6 now features nearly every carbon fiber component GYT-R offers, all of which are available through your local Yamaha dealer – most dealers will even roll the price of any GYT-R accessories into your finance payments if you pick them up at the same time you purchase your new Yamaha! We chose to install GYT-R’s carbon fiber rear fender and swingarm guards, lower tank trim and fairing accents. The GYT-R carbon products are excellent quality, very thin and lightweight without being flimsy, and as you would expect from an OEM product, the fit is perfect. The carbon features a gloss clear coat for enhanced looks, which should also protect the carbon fiber from the ‘yellowing’ that can sometimes occur when bare carbon is exposed to the sun’s UV rays over long periods of time.
The rear fender is a snap to install – the carbon GYT-R piece is an exact replacement for the stock fender, which is attached with three allen-head bolts. The GYT-R carbon fiber rear fender even features a hole to attach the rear brake line bracket which is found on the right side of the stock rear fender, and swapping the plastic bracket can be done by hand as it uses a simple ‘squeeze clip’ method of attachment.
If the rear fender is easy because it only requires three bolts, the swingarm guards are even easier. Replacing the stock plastic pieces that are designed to protect the swingarm from being scratched by the rider’s heels, the GYT-R carbon fiber swingarm guards are equipped with three “peel and stick” pieces of adhesive, just like the stock guards they replace. Just grab the stock pieces and give a solid pull to yank them off, spend a few seconds peeling off the remaining adhesive from the swingarm, then ‘peel and stick’ the new carbon guards.
Balancing out the fender and guards at the rear are the tank trim and fairing accents up front. Again, quality is excellent and install is a snap, the fairing accents requiring only two allen head bolts, while the tank trim requires removal of the seat and then removing ONE phillips-head screw per side! All these carbon panels can be installed in about 30 minutes of total work, and do a lot for the look of the bike . . . carbon-fiber beats the look of plastic every time.

GYT-R Carbon Slip-On Muffler
When photos of the new R6 first hit the press, readers and journalists alike went ga-ga over the aggressive looks of the stubby under-peg muffler — its tiny size made possible by the silencing properties of the catalytic converters hidden under the R6’s belly pan. However, as I mentioned at the beginning of this article, the popularity of the new R6 in the showrooms means that the bike’s stock looks won’t stand out in a crowd much these days.
Enter GYT-R’s carbon-cased, slip-on muffler – and stubbier, even more aggressive looking than the stock muffler. Completely rebuildable and a claimed 24% lighter than stock, the GYT-R muffler adds an extra dose of race-bred aggressiveness to our R6’s looks. What it doesn’t seem to add is noise, which could be a good or bad thing, depending on your taste – again as a result of the silencing properties of the catalytic converters, if the R6 is any louder we can’t tell, the only noticeable difference being a slight burble and a few tiny pops on closed-throttle decel.
Install was again a snap, requiring only two allen wrenches, a 12mm socket, and perhaps 30 minutes time. We installed the GYT-R muffler without adding any type of aftermarket fuel computer, as its designed to work with the stock bike’s fuel mapping. If the muffler offers any performance increase, it’s too small to detect by the rider, but before the next install we’ll have the R6 on the dyno for a before-and-after comparison with the stock pipe (we will also report back on the actual weight reduction afforded by the GYT-R muffler).
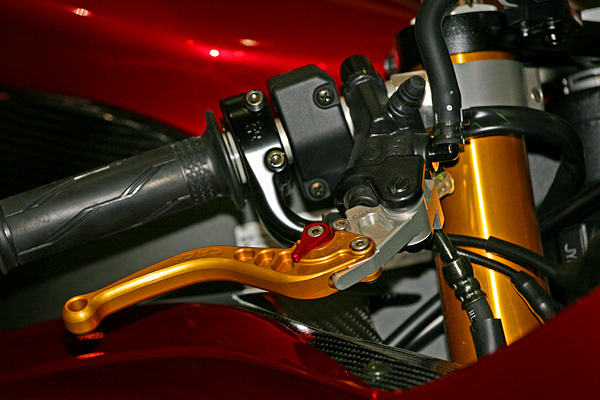
Constructors Racing Group Radial Roll-A-Click Billet ‘Shorty’ Levers
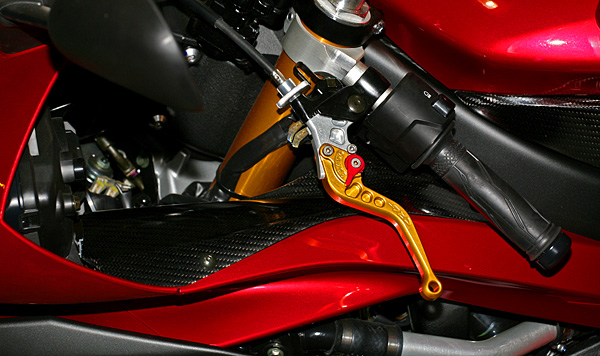
Coming from a motocross background, I’ve maintained the habit of always keeping the clutch and brake covered while riding, monitoring and controlling each with only two fingers at a time. Thus when CRG offered to provide us with a pair of their Roll-a-Click adjustable billet levers, I chose the ‘shorty’ option – which offers the perfect shape for my two-fingered clutch and brake control, while looking much cooler than the stock pieces due to their sculpted billet looks and shorter-than-stock size.
Finished in anodized gold with red adjustment clickers, the CRG levers provide a clean, race-inspired styling accent to the front end of our R6, and functionally make it much easier to adjust the lever’s positioning in relationship to the bar – the Roll-a-Click adjuster has 5 positions that are easily selected with the rider’s pointer finger, even while riding.
As a former CNC machinist myself, I was extremely impressed with the quality and finish of the CRG levers, and their identical-to-stock fit made install easy, with one 10mm nut for each lever being dispatched in about 5 minutes per side. Pivoting action is smooth as silk, and the combination of light weight, easy adjustability, and good looks seems hard to beat.
Conclusion
We hope we’ve given sportbike owners a few ideas about how to personalize their bikes without outlaying a ton of cash. Check back next time as we try to give the R6 a boost in grunt to help it more easily dispatch around-town riding on the way to the canyons where it really struts its stuff.
